New effects, LFOs and scenes for Hotone Ampero pedals
Dubshift is free custom firmware for the Hotone Ampero Mini and the Ampero II Stomp. It's built on the official firmware and adds what that one is missing. It also switches Chinese-version Ampero II Stomp pedals to English.
The Mini gets seven new effects, from granular clouds and a freeze pedal to a lo-fi delay and endless sustain, two LFOs with a step sequencer, four scenes per patch, an XY pad, your own drum patterns with fills, and a looper that stays locked to the drum machine. The Stomp gets the locked looper and your own drum patterns too, two LFOs per patch you can tweak from the main screen, and footswitch hold and combo actions you choose yourself.
You load the official file from Hotone, the patching runs in your browser, and you flash the result with Hotone's editor. Your presets keep working.

Dubshift is free and stays free. If it's useful to you, support it on Boosty: supporters get every new release a few weeks before everyone else. Visa and Mastercard from any country; choose USD or EUR at checkout.
| Pedal | Model | Firmware | What can be added |
|---|
Other versions and the Ampero II Stage aren't supported. The builder only accepts the exact official files listed above.
What's in it
Ampero Mini
- Seven new effects. Granular, Freezer, Pitch Parrot, Hyper Fuzz, Opto 2A compressor, Sustainer and Shimmer+, written for the Mini's audio processor.
- Two LFOs per patch. Anything you can put on the expression pedal moves by itself: tremolo on the volume, a filter sweep in time with the drums, a delay that comes up only when you stop playing. Draw your own 16-step patterns with your finger.
- Four scenes per patch. Verse, chorus and solo versions of one sound, switched with the footswitches without a gap, with an optional glide between them.
- A looper that stays in time. Loops are rounded to whole bars and held in phase with the drum machine for as long as they run.
- Your own drum patterns. Eight user patterns drawn on a step grid, with fills, humanize and a speed trainer that raises the tempo as you practise.
- An XY pad. Move two parameters at once with one finger, or roll the dice for new settings.
Ampero II Stomp
- Loop Sync. Loops come out a whole number of beats long and stop drifting away from the drums. ON+DRUM starts the drums together with the recording, COUNT-IN adds a count-in.
- Two LFOs per patch. 14 shapes including rhythmic gates, a step sequencer and an envelope follower, synced to the tempo or restarted on every picked note. Tweak them from the main screen or the Quick Access knobs.
- Your own drum patterns. Eight user patterns in the drum list, drawn on a step grid on the touchscreen.
- An XY pad. Move two parameters at once with one finger, or roll the dice for new settings.
- Your own footswitch actions. Choose what holding each switch and pressing two together does: tuner, looper, previous patch, momentary and more. Tap tempo averages your last taps.
- English on Chinese-market pedals, display brightness that stays set, and the scene paste fix.
Build
You need the pedal and its USB cable, a computer with Hotone's editor for the pedal, and about ten minutes. The builder also works on a phone, but flashing needs the computer.
- Download the firmware for your pedal from Hotone's support page and load it here, as the .zip you downloaded or the .bin inside it.
- Choose what goes into the build.
-
Build. The file is checked before it's saved; then flash it as described under Flashing.
Ampero Mini
The Mini gets the most out of Dubshift: seven new effects, two LFOs with a step sequencer, four scenes per patch, your own drum patterns, an XY pad and a looper locked to the drums. Dubshift 1.0 for the Mini contains everything below. The LFOs, scenes and Loop Sync stay off until you use them, and the new effects are added after the stock models, so existing presets sound the same.
Every feature below worked on our Mini. The drum machine and the XY pad went through several rounds of fixes, so this exact release is being tested again as a whole before it's published.
- New effects seven models
- Two LFOs per patch
- Scenes
- Loop Sync
- Drum patterns
- XY pad
- Boot animation
- Where things are
New effects
Tested on MP-50 2.2 (Sustainer only as part of full builds).
Written for the Mini's audio processor and added after the stock models in each list, so existing presets aren't affected. Each new model has a fixed ID, so presets that use them keep working in later releases. On the stock firmware a new model is replaced by the stock model before it in the list, with its settings reset.
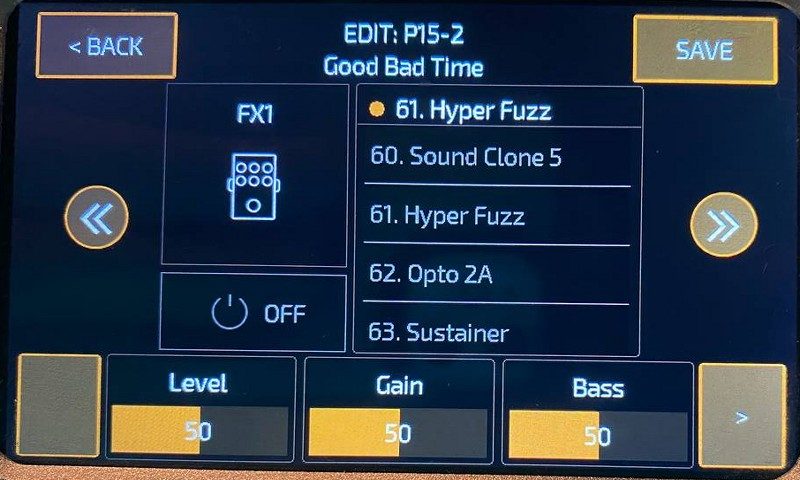
Open: tap EDIT on the main screen to see the signal chain, tap a block (FX1, FX2, MOD, DLY or RVB) and pick the model from the list. The new ones are at the end of the list.
| Model | Slot | What it does |
|---|---|---|
| Granular | MOD | Chops what you play into grains and scatters them into a cloud: pads and textures from single notes |
| Freezer | MOD | Turn the block on and the current sound is held, so you can play over your own frozen chord |
| Pitch Parrot | MOD | Warbly lo-fi delay modelled on the PT2399 chip, 30–1200 ms or synced to the tempo |
| Hyper Fuzz | FX1, FX2 | High-gain fuzz, oversampled |
| Opto 2A | FX1, FX2 | Optical levelling compressor modelled on the LA-2A |
| Sustainer | FX1, FX2 | Endless sustain in the style of an EBow: each note you pick is held and keeps ringing, with Attack, Sustain, Tone, Mix, and Follow or Hold |
| Shimmer+ | RVB | Reverb with a pitched tail: an octave up, a fifth, a fourth, an octave down, or an octave and a twelfth up |
Two LFOs per patch
Tested on MP-50 2.2.
Two LFOs drive the expression targets of the patch, so anything you can put on the EXP pedal moves by itself, in time with the tempo or the drums. Each target follows LFO 1, LFO 2 or neither. The settings are stored in the patch.
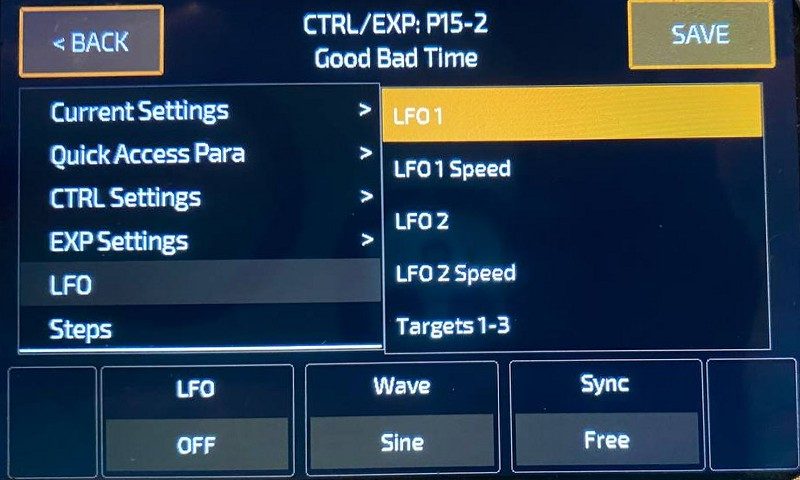
Open: tap CTRL/EXP on the main screen and choose the LFO tab, the fifth in the list on the left. Shortcut: hold CTRL/EXP for about half a second and let go; it opens on the LFO tab directly. Holding EDIT on the signal chain screen (not the main screen; there it opens the XY pad), or an effect's ON/OFF button in the editor, does the same. Pick a row on the right; its three values are at the bottom and change with the three knobs, a tap, or a drag.
| Row | Values |
|---|---|
| LFO 1, LFO 2 | On: Off or On. Wave: Sine, Triangle, Saw Up, Saw Down, Square, S&H, Duck, Expand, Seq. Sync: Free or Tempo; for Duck and Expand this value is Sens, 0–100 |
| LFO 1 Speed, LFO 2 Speed | Rate: 0.05–10 Hz, or a note value from 1/32 to 4 Bars with Tempo sync. For Seq with Free it's in steps per second, for Duck and Expand it's the release time in ms. Low and High: the range the targets move in |
| Targets 1–3 | For EXP targets 1, 2 and 3: LFO 1, LFO 2 or Off |
| Target 4 / Vol | For target 4 and the EXP volume: LFO 1, LFO 2 or Off |
Defaults: both LFOs off, note value 1/4, Low 0, High 100, Sens 50, every target on LFO 1.
To use it:
- On the EXP Settings tab of CTRL/EXP, assign up to four parameters with their ranges, as for a pedal.
- On the LFO tab, turn LFO 1 on and choose a wave. All targets follow LFO 1 at first; use the Targets rows to give some to LFO 2 or turn them off.
- Set the speed and range, then save the patch.
- Duck turns the targets down while you play and Expand turns them up: for example a delay that only comes up when you stop playing.
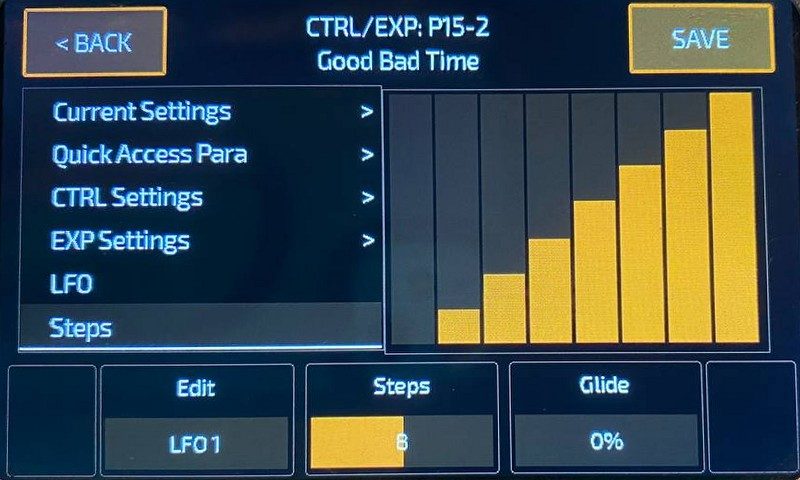
- Seq plays your own pattern of 4, 8 or 16 steps. Draw the steps with your finger on the Steps tab (sixth in the list); its bottom values choose which LFO you edit, the number of steps and Glide (how smoothly it slides between steps).
- With Tempo sync and the drum machine running, the LFO locks to the drum bar.
- While an LFO runs, the physical EXP pedal does nothing in that patch.
- Turning an LFO on drops the patch's MIDI CC11 targets.
- Uploading a patch from the PC editor loses its LFO and step settings. On the stock firmware the LFO settings are ignored.
Scenes
Tested on MP-50 2.2.
Each patch gets four scenes: different versions of the same sound, switched without a gap, such as a clean verse, a crunchy chorus and a lead. The first scene, BASE, is the patch itself. Scenes 2–4 only remember what you change in them, so an edit to BASE carries over to every scene that didn't touch that setting.
Where: four scene buttons on the main screen, in the row under the patch name: BASE, SCENE 2, SCENE 3, SCENE 4 (or the names you give them). The settings are in Global › I/O, the > arrow to the second page.
| Setting | Values |
|---|---|
| FS MODE | Auto (default): FS1 and FS2 switch scenes in patches that have scenes, and patches otherwise; empty scenes are skipped. Patch: as stock, the footswitches change patches and the scene buttons are hidden. Scene: the footswitches always step through all four scenes |
| SCENE GLIDE | Off: jump to the new scene. On: fade the values over GLIDE TIME. Switches and Time, Delay and Sync parameters always jump |
| GLIDE TIME | 50–2000 ms |
To make scenes:
- Set up the patch as usual. This is BASE.
- Tap the SCENE 2 button. Change whatever should be different: knobs, blocks on or off, CTRL switches. Every change you make now belongs to scene 2.
- Do the same for scenes 3 and 4 if you need them, then press SAVE. Scenes are only kept when you save.
- Switching: FS1 goes to the previous scene, FS2 to the next; holding FS1 or FS2 goes to the previous or next patch. In Auto mode this starts once the patch has at least one scene. You can always tap the scene buttons. A patch always loads on BASE.
- Hold a scene button (about half a second) for a menu: COPY saves the sound you hear right now into that scene, the quickest way to make one; RESET clears it back to BASE; NAME picks a name: VERSE, CHORUS, SOLO, LEAD, INTRO, OUTRO, BRIDGE, CLEAN, CRUNCH, RHYTHM, BOOST or AMBIENT. On BASE the menu only has COPY, which makes the current sound the new base.
- The patch name shows the active scene, for example "Edge Lead - SOLO", or "(=BASE)" when the scene doesn't differ from BASE. In the effect editor, the labels of settings the scene changes are coloured.
- A scene holds up to 28 changed settings plus the on/off state of every block. The name shows FULL for two seconds when you hit the limit.
- Settings that are EXP or LFO targets aren't stored in scenes.
- Switching a block on or off between scenes has the same short dip (10–15 ms) as on stock; turning DLY or RVB off cuts its tail.
Limits. Scenes work in the first 99 patches (the user bank), not in the factory bank. They are stored apart from the patch, so uploading from the PC editor, or copying or moving a patch, doesn't take them along. Changing an effect model clears that block's changes in all scenes. A factory reset deletes all scenes. The stock firmware doesn't know about scenes.
Loop Sync
Tested on MP-50 2.2.
The Mini already has a looper sync option, but the loop still drifts and stutters where the drum pattern starts over. Dubshift replaces it. The first recording is rounded to whole bars, and playback is kept in phase with the drum beat for as long as the loop runs.
Open: press FS1 and FS2 together to open the looper, then tap SYNC.
To use it:
- Turn SYNC on and start the drums.
- Record, and close the recording near the end of a bar. Too early, and it keeps recording to the bar line; too late, and the extra bit is cut off. A bar is always 4 beats, also for patterns in 3/4.
- To go straight into overdub, press again while it waits for the bar line: it still records up to the bar line, then switches to overdub instead of playback.
- The loop is only synced if SYNC is on and the drums are running when the first recording closes. It uses the drum tempo.
- Unlike stock, SYNC can be turned on with a loop already recorded or with the drums stopped, and it stays on when the drums stop.
- Half speed and reverse still work; the sync picks up again when both are off.
- With SYNC off or the drums stopped, a recorded loop keeps its length but is no longer pulled back into phase. New loops are recorded as on stock.
How it works
On the Mini the looper runs on the audio processor, which receives a pulse from the drum machine on every beat. The patch replaces the looper's sync routine: it sets the loop to an exact number of bars at the drum tempo, tracks where the beats fall in the loop, and moves playback back into phase with a short crossfade (under a millisecond) when it is off by more than about a millisecond. It uses about 1 % of the audio processor.
Drum patterns
Tested on MP-50 2.2.
The drum machine gets eight user patterns, U1 USER 1 to U8 USER 8, after the 100 stock ones in the pattern list. You draw them on a step grid with your finger, with the same 13 drum sounds the stock patterns use.
Open: tap DRUM on the main screen. The drum page has two new buttons at the top right, EDIT and FILL. EDIT opens the editor on a user pattern and selects it for playback. The user patterns are also in the pattern list, after the stock ones.
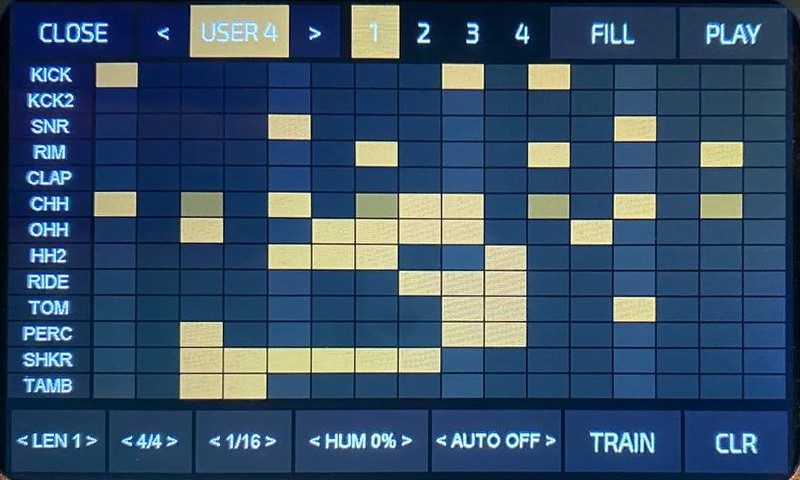
The editor:
- Top row: CLOSE, < USER n > to switch pattern, bars 1–4, FILL (edit the fill bar; tap again to go back) and PLAY/STOP.
- Grid: one row per drum sound, one column per step. Tap a cell to switch it on or off, swipe to paint along your finger. Hold a cell for half a second to change its velocity: accent, ghost, normal. The colour shows the velocity, and a strip under the grid shows the playing step. Tap a row name to hear the sound.
- Bottom row: tap the left half of a value for −, the right half for +.
| Setting | Values |
|---|---|
| LEN | 1–4 bars |
| METER | 4/4, 3/4, 5/4, 6/8, 7/8 |
| GRID | 1/4, 1/8, 1/16, 1/32, 1/8T, 1/16T (only the ones that fit the meter). Hits move to the nearest new step |
| HUM | Humanize, 0–100 %: up to ±17 ms timing and ±20 % velocity, rolled again on every pass |
| AUTO | Off, or play the fill bar every 2, 4, 8 or 16 bars |
| TRAIN | Speed trainer, see below |
| CLR | Clears the bar you see. Tap, then tap again within 3 seconds (or hold) |
CLOSE saves the patterns. Edits are heard straight away, also while the pattern plays.
- Fills: tap FILL on the drum page, or hold FS1 or FS2 there, and the next bar is replaced by the pattern's fill bar. Tap again to cancel. Fills only exist in user patterns.
- Speed trainer: tap TRAIN for its own row. While the drums play, the tempo goes up by STEP (1–10 BPM) every EVERY bars (1, 2, 4 or 8) until MAX (40–250 BPM). When you stop, the tempo goes back to where you started. It works with stock patterns too and keeps running when you leave the editor. Trained tempos are never saved.
User patterns are stored in the pedal, not in a patch, and a factory reset deletes them. The stock firmware ignores them.
XY pad
Tested on MP-50 2.2.
A full-screen pad that moves two parameters of the patch at once with one finger: X left to right, Y bottom to top.
Open: on the main screen, hold the EDIT button at the top right for about half a second. A short press opens the signal chain as before.
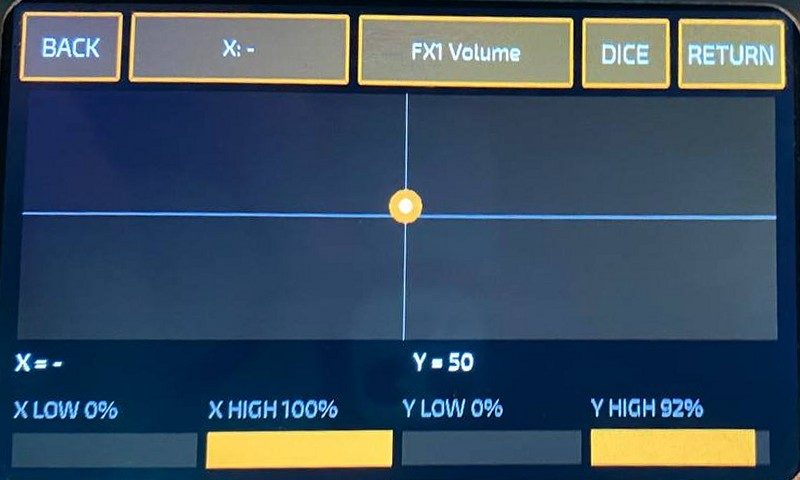
- X and Y at the top choose the parameters. Tap the right half of the button for the next one and the left half for the previous one, through every parameter of every block in the patch, then off. By default X and Y are the first two parameters of the first block that's on, looking at DLY, RVB, MOD, FX2, FX1 and AMP in that order: for example DLY Mix and DLY Feedback.
- The four sliders at the bottom set the range of each axis, as a percentage of the parameter's range. Set LOW above HIGH to turn an axis around.
- RETURN glides back to the patch's value when you let go; HOLD keeps the pad's value until you load the patch again.
- DICE sets the X block's parameters to random values; hold it for half a second to randomise every block that's on except AMP, NR, CAB and EQ. Volume and level controls and EXP or LFO targets are left alone. For two seconds the button reads UNDO. Dice changes the patch like a normal edit; press SAVE to keep them.
- Moving the pad doesn't change the patch: it's not saved and not recorded into scenes. The X/Y choice and ranges are kept per patch.
- Footswitches, the EXP pedal and the volume knob keep working on the pad screen.
Where things are
The main screen has four buttons along the top: CTRL/EXP, DRUM, GLOBAL and EDIT.
| What | How to get there |
|---|---|
| New effects | EDIT › tap a block › model list (at the end) |
| LFOs | CTRL/EXP › LFO tab (fifth). Shortcut: hold CTRL/EXP |
| LFO steps | CTRL/EXP › Steps tab (sixth) |
| Scenes | Scene buttons under the patch name on the main screen. Hold one for COPY / RESET / NAME |
| Scene settings | GLOBAL › I/O › > (second page): FS MODE, SCENE GLIDE, GLIDE TIME |
| Loop Sync | FS1 + FS2 together (looper) › SYNC |
| Drum editor | DRUM › EDIT (top right) |
| Fill | DRUM › FILL, or hold FS1 or FS2 on the drum page |
| Speed trainer | DRUM › EDIT › TRAIN (bottom row) |
| XY pad | Hold EDIT on the main screen for half a second |
Boot animation
The Dubshift animation replaces Hotone's; the scenes, XY pad and drum code live in the space it frees.
Ampero II Stomp
Dubshift 1.0 for the Stomp contains everything below. Most of it does nothing until you turn it on. Three things are different straight away: the boot animation, the paste fix, and tap tempo, which now averages the last 4 taps (set TAP AVERAGE to 1 for single taps). The English unlock is a separate option.
A green mark means the feature worked on our Stomp.
- Language unlock optional
- Loop Sync
- Display brightness
- Two LFOs per patch
- LFO on the main screen
- Quick Access knobs for LFOs
- Drum patterns
- XY pad
- Footswitch actions and tap tempo
- Paste restores all scenes
- Boot animation
- Where things are
worked on our pedal not tested on a pedal yet
English on Chinese-version pedals
Optional, also on stock firmware. Tested on MP-300 2.4.0 and 2.5.0. Also offered for the Ampero II (MP-350 1.4.0), not tested there.
Pedals sold in China only list Chinese under Global › Language, although the English texts are in the firmware. With the patch both languages are listed and the pedal starts in English.
How it works
The firmware builds the language list from a bit mask in a factory sector of the flash, which isn't part of the firmware file. Chinese-market units have only the Chinese bit set. The patch changes the function that reads the mask so that it always reports both languages. The factory sector is not written.
| Stock | 01 48 d0 f8 48 01 70 47 |
| Patched | 03 20 70 47 48 01 70 47 |
Loop Sync
Tested on MP-300 2.5.0.
On the stock firmware a loop recorded over the drum machine is a few milliseconds too long or too short, and it drifts away from the drums a little more on every pass. Loop Sync makes the first recording a whole number of beats long, so the loop stays in time.
Open: hold FS2 to open the looper, then right arrow to page 3.
| Setting | Values |
|---|---|
| LOOP SYNC | OFF (default), ON, ON+DRUM, COUNT-IN. Left knob |
| SYNC BEATS | 1–16, default 4. The loop length is rounded up to a multiple of this many beats: 4 for bars of 4/4, 3 for 3/4. Right knob |
| PLAYED | Middle row, display only: how long you've played since power-on, as MM:SS. Counts while there is signal at the input, plus 2 seconds after it stops. Not saved |
To use it:
- Set LOOP SYNC to ON and start the drums. Sync only works while the drums play, between 40 and 300 BPM.
- Record, and close the recording (PLAY, OVERDUB or STOP) slightly before the end of the bar. The looper keeps recording until the loop is a whole multiple of SYNC BEATS, counted from where you started, and closes there. If you close just after a bar line, it waits until the next one. Pressing again while it waits closes immediately.
ON+DRUM also restarts the drum pattern when you start recording, so the loop and the drum bar start together. If the drums are stopped, they start and recording begins at once. COUNT-IN works the same, but with the drums stopped it first counts in SYNC BEATS beats; press again during the count-in to start recording at once. In both modes Stop or Clear on the looper also stops the drums if recording started them; drums that were already playing keep playing.
With LOOP SYNC off or the drums stopped, the looper behaves as stock. LOOP SYNC and SYNC BEATS are global and kept after power-off.
How it works
The looper and drums run on a separate DSP; the main processor sends it commands. The patch holds back the "close recording" command until the recording is a whole number of beats long at the current tempo, timed from the system tick and timer register to about 1 µs. What's left is the DSP's command jitter, around ±1 ms per loop.
Display brightness
Tested on MP-300 2.5.0.
Open: Global › Display, third row BRIGHTNESS: 10–100 % in steps of 10.
The setting was already in the firmware, but the pedal went back to 100 % at every start. Now it's kept after power-off.
Two LFOs per patch
Tested on MP-300 2.5.0.
Two LFOs act as expression pedals that move by themselves. Whatever is assigned to EXP 1 follows LFO 1 and whatever is on EXP 2 follows LFO 2, in time with the tempo. Each patch has its own LFO settings.
Open: hold the EXP 1 or EXP 2 indicator on the main screen (or go to PATCH SETTINGS › EXP 1/2 Settings). The Target column now has a fifth row, LFO 1 (on EXP 2: LFO 2). Tap it.
The LFO screen looks like the EXP screen:
- Left column: Target 1–4 and LFO n. Tap a target to go back to the EXP screen with that target selected, so switching between the two feels like changing tabs.
- Middle column: the setting groups A–D below, each showing its current values. Tap a group to edit it.
- Right column: whether the LFO is running, what it drives, the input level for ENV and DUCK, and VIEW > (see LFO on the main screen).
- Bottom row: the three settings of the selected group. Change them with the three knobs, the encoder, by dragging, or by tapping the left or right half of a value. The arrows step through the groups.
BACK returns to where you opened the EXP screen from.
| Group | Setting | Values |
|---|---|---|
| A | SHAPE | OFF, SINE, TRI, SAW UP, SAW DN, SQUARE, S&H, SMOOTH RND, GATE 1–4 (rhythm patterns), SEQ (your own steps), ENV (rises when you play harder), DUCK (falls when you play harder) |
| RATE | At the tempo: 4 BAR, 2 BAR, 1 BAR, 1/2, 1/2., 1/2T, 1/4, 1/4., 1/4T, 1/8, 1/8., 1/8T, 1/16, 1/16T, 1/32. Then free: 0.05–10 Hz | |
| PHASE | 0–315°. With ENV or DUCK it shows the input level instead, to help set the sensitivity | |
| B | DEPTH | 0–100 % in steps of 10: how far the LFO swings down from the maximum |
| SMOOTH | 0–10: rounds off hard edges. With ENV or DUCK: how fast it returns after you stop playing | |
| WIDTH | 10–90 % in steps of 10: pulse width of SQUARE, slope of TRI. With ENV or DUCK it becomes SENS 1–9 | |
| C | SYNC | FREE; PATCH (restart on patch change); DRUM (restart when the drums start); PICK LO, MID, HI (restart on every picked note; HI reacts to the softest notes) |
| SWITCH | ALWAYS, or CTRL 1–3: the LFO only runs while that CTRL is on. Put the CTRL on a footswitch to turn the LFO on and off with your foot | |
| TARGET | Its own EXP tab, or the other LFO's RATE (slows it down to ×1/4 or speeds it up to ×4) or DEPTH (can only reduce it) | |
| D | SEQ LEN, STEP, VALUE | 2–16 steps, pick a step, set it to 0–100 %. This group only appears when SHAPE is SEQ |
Defaults: SHAPE OFF, RATE 1/4, PHASE 0°, DEPTH 100 %, SMOOTH 0, WIDTH 50 %, SYNC FREE, SWITCH ALWAYS, TARGET its own EXP tab, 16 steps.
Draw the steps. With group D selected, the middle and right columns turn into one bar per step. Touch a bar to set it to your finger's height (0–100 % in 10 % steps), or swipe across to paint several at once. The playing step lights up.
To use it:
- In the patch, assign the parameters to move on the EXP 1 tab (for LFO 1) or the EXP 2 tab (for LFO 2), with their minimum and maximum, the same way as for a real pedal.
- Tap LFO 1 (or LFO 2) in the Target column, select group A and set SHAPE to anything but OFF. The parameters start moving.
- Set RATE and the rest, then press SAVE to keep it in the patch. The patch may not show as edited after an LFO change, so save anyway.
- While an LFO runs and its TARGET is its own EXP tab, the real expression pedal on that tab is ignored. An LFO that targets the other LFO leaves the pedal alone.
- When an LFO stops in a patch (SHAPE set to OFF, or its SWITCH CTRL turned off), its parameters go to their maximum.
- The tempo is the patch or global tempo. Outside 40–300 BPM the LFO uses 120.
- Patches with LFO settings load on the stock firmware too; it ignores the LFO part.
LFO on the main screen
Tested on MP-300 2.5.0.
Shows the LFO settings in the main screen's knob panel, like an effect block, so you can adjust them while you hear the patch.
Open: on the LFO screen, tap VIEW > in the right column. The main screen opens on the LFO and group you were editing, with three knobs on screen; the arrows page through LFO 1 A–D and LFO 2 A–D. Turn the three physical knobs or drag on the screen; a fast turn moves two steps at a time. Tap a block in the chain to leave.
Quick Access knobs for LFOs
Not tested yet.
Puts LFO settings on the three Quick Access knobs of the main screen, so you can, for example, change an LFO's rate live without opening a menu. Set separately for every patch.
Open: Global › Controls, page 4. Rows KNOB 1 -> LFO, 2 and 3: OFF (the knob works as usual) or any of the 24 LFO settings, such as LFO1 RATE. The knob's label on the main screen then shows that setting and its value.
Turn the physical knob; dragging on the screen does nothing for a knob mapped to an LFO. Press SAVE to keep the mapping in the patch.
Drum patterns
Tested on MP-300 2.5.0. User patterns play and are kept after power-off.
The drum machine gets eight user patterns, U1 USER 1 to U8 USER 8, after the 100 stock ones in the pattern list, with the same 13 drum sounds. Pick one like any stock pattern.
Open: open the drum machine on the touchscreen, then tap EDIT at the top right. It opens a user pattern for editing.
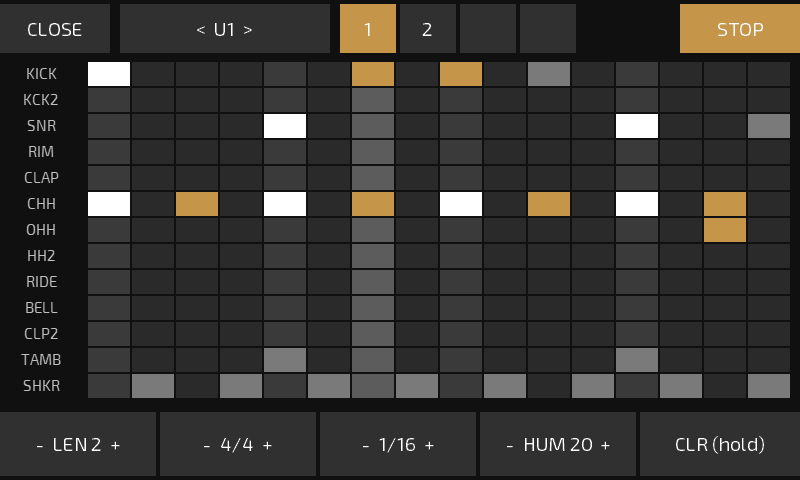
- Top row: CLOSE, < Un > to switch pattern, bars 1–4 and PLAY/STOP.
- Grid: one row per drum sound, one column per step. Tap a cell to switch it on or off, swipe to paint along your finger, hold for half a second to change its velocity (accent, ghost, normal). The playing step is marked.
- Bottom row: LEN (1–4 bars), METER, GRID, HUM (humanize) and CLR (hold to clear the bar you see). Left half of a value −, right half +.
- Knobs: BPM, drum volume, HUM.
CLOSE saves the patterns and goes back to the drum screen. Edits are heard while the pattern plays, without breaking the groove.
Fills, as on the Mini, are planned for a later release. User patterns are stored in the pedal, not in a patch. The stock firmware ignores them.
How it works
The Stomp's drums run on its DSP, which copies a stock pattern into a working buffer and plays from there. Dubshift adds a DSP command that loads a pattern into that buffer from the main processor, so patterns can change while they play. Each step has a fixed size in the buffer, so the play position stays valid when you edit.
XY pad
Tested on MP-300 2.5.0.
A full-screen pad that moves two parameters of the patch at once with one finger: X left to right, Y bottom to top. It works like the Mini's XY pad.
Open: on the main screen, hold the tempo icon. A tap still opens the tempo popup. BACK or pressing the encoder closes the pad.
- X and Y at the top choose the parameters. Tap the right half of the button for the next one and the left half for the previous one, through every parameter of every block in signal-chain order, and “–” to switch the axis off. By default X and Y are the first two parameters of the first block that's on, looking at DLY, RVB, MOD, DRV, FREQ and AMP in that order.
- The four sliders at the bottom set the range of each axis, as a percentage of the parameter's range. Set LOW above HIGH to turn an axis around.
- RETURN glides back to the patch's value when you let go; HOLD keeps the pad's value until you load the patch again. Tap the button to switch.
- DICE sets the X block's parameters to random values; hold it for half a second to randomise every block that's on among DYN, FREQ, WAH, DRV, MOD, DLY and RVB. Volume and level controls and EXP or LFO targets are left alone. For two seconds the button reads UNDO. Dice changes the patch like a normal edit; save the patch to keep them.
- Moving the pad doesn't change the patch: it's not saved and not recorded into scenes. The X/Y choice and ranges are kept per patch.
The X/Y choices are stored in the pedal, not in the patch, and a factory reset doesn't clear them. If you change the block an axis points at, the pad lets go of it (HOLD ends).
Footswitch actions and tap tempo
Tested on MP-300 2.5.0.
The stock firmware fixes what holding a footswitch or pressing two together does, and resets it at every start. Here you choose, and the choice is kept after power-off.
Open: Global › Controls, pages 5 and 6.
| Setting | Values |
|---|---|
| HOLD FS1, FS2, FS3 | What holding the switch does: OFF, TUNER, LOOPER, UNIT MODE, TAP TEMPO, BYPASS, DRUM, PREV PATCH, PATCH +, PATCH −, BANK +, BANK −, SCENE 1/2, CTRL1, CTRL2, CTRL3, MOMENTARY |
| FS1+FS2, FS2+FS3 | What pressing the two together does: the same list without MOMENTARY |
| TAP AVERAGE | 1–8, default 4: how many taps tap tempo averages |
- PREV PATCH jumps to the patch you played before, even in another bank. Pressed again, it jumps back, so it toggles between two patches. It forgets the previous patch at power-off.
- MOMENTARY flips the switch's normal function while you hold it and flips it back when you let go: an effect that is off comes on while held, one that is on goes off. It works when the switch turns an effect block or CTRL 1–3 on and off.
- Tap tempo accepts taps 200–1500 ms apart (40–300 BPM). A pause of more than 2 seconds, or a tap that is more than 25 % off, starts the average over.
Paste restores all scenes
Tested on MP-300 2.5.0. Always on.
When you copy a block and paste it, the stock firmware only brings over its first scene; scenes 2 and 3 keep the settings of the model that was there before. With this fix all three scenes are pasted.
Boot animation
The Dubshift animation, shown at the top of this page, replaces Hotone's. The new code lives in the space the old animation used, so the two can't be swapped back separately.
Where things are
| What | How to get there |
|---|---|
| Loop Sync | Hold FS2 (looper; unless you gave HOLD FS2 another action) › right arrow to page 3: LOOP SYNC, SYNC BEATS, PLAYED (global) |
| Display brightness | Global › Display › BRIGHTNESS (global) |
| LFO 1, LFO 2 | Hold the EXP 1 or EXP 2 indicator on the main screen › row LFO 1 / LFO 2 (per patch) |
| LFO on the main screen | LFO screen › VIEW > |
| Quick Access knobs for LFOs | Global › Controls, page 4 (per patch) |
| Drum editor | Open the drum machine on the touchscreen (there is no footswitch shortcut) › EDIT (top right). U1–U8 are also in the pattern list (global) |
| XY pad | Hold the tempo icon on the main screen (per patch) |
| Footswitch actions, TAP AVERAGE | Global › Controls, pages 5–6 (global) |
Flashing
There's no warranty. We test on our own pedals, but we can't check every unit or every way an update can go wrong, and a release can contain features that haven't been on a pedal yet (they're marked above). If something breaks, getting the pedal back is up to you. Read this section to the end before you start.
- Back up your presets and IRs with the Hotone editor. An update can reset them.
- Keep the stock firmware file next to the one you built. You'll need it to go back.
- Connect the pedal over USB and open the current Hotone editor for it. On the Ampero II Stomp, older editor versions refuse every file, stock included, with "firmware not compatible".
- Choose Firmware Update, select the file you built and wait until the pedal restarts on its own. Don't unplug it, switch it off or close the editor in the meantime.
- To go back, flash the stock file the same way.
If the pedal doesn't start
Both pedals have an update mode that firmware updates don't overwrite. From there the editor can flash them again.
Ampero II Stomp: with the power unplugged, hold down all three footswitches and the MENU/VALUE knob, then plug the power in. Let go once the pedal is in update mode and flash the stock firmware. Some instructions call this "footswitches 3 + 4", because 1 and 2 pressed together count as footswitch 4.
Ampero Mini: with the power unplugged, hold footswitch 1 and plug the power in. Let go once the pedal is in update mode and flash the stock firmware.
If the editor doesn't see the pedal in update mode, try a different USB cable and port first. Don't try other button combinations.
Releases
Dubshift 1.0
Not released yet.
First release. Ampero II Stomp 2.5.0: Loop Sync, display brightness, two LFOs per patch with their own screen, finger-drawn steps, the main-screen view and Quick Access knobs, user drum patterns with a step editor, footswitch actions and tap tempo averaging, the scene paste fix and the boot animation. Ampero Mini 2.2: Loop Sync, two LFOs per patch with step sequencer, four scenes per patch, seven new effects, user drum patterns with fills and a speed trainer, the XY pad and the boot animation. English unlock for the Stomp 2.4.0 and 2.5.0, and for the Ampero II 1.4.0.
Being worked on
- Ampero II Stomp: drum fills and auto-fill, as on the Mini.
- Ampero Mini: the English unlock. The Mini has the same factory language lock as the Stomp; the place to patch is known, but it hasn't been tried on a Chinese-market Mini yet.
- New Hotone firmware versions, some time after they come out.
FAQ
My Ampero II Stomp is the Chinese version. Can I switch it to English?
Yes. Chinese-market Ampero II Stomp pedals only list Chinese under Global › Language, although the English texts are in the firmware. Load your official firmware file (MP-300 2.4.0 or 2.5.0) above and tick the English unlock: both languages are listed and the pedal starts in English. It is free and works on the stock firmware too. Step by step: Ampero II Stomp in English.
Is my firmware file uploaded anywhere?
No. The page reads the file, patches it and packs it again in your browser. The site only serves itself and the patch data; it never sends your file anywhere, and it doesn't host Hotone's firmware. It does count visits and builds anonymously: which pedal and firmware version, and whether the build worked. No cookies, and IP addresses aren't stored.
Why was my file refused?
Dubshift is written for one exact build of the firmware. The builder checks the file's SHA-256 against the official releases listed above and refuses anything else, because a patch in the wrong place can leave the pedal unable to start. The message under the file says what it found.
Will my presets still work?
Presets made on the stock firmware load and sound the same on Dubshift. The other way round, presets made on Dubshift load on the stock firmware, without the parts it doesn't know: LFO settings are ignored, Mini scenes are missing, and a new Mini effect is replaced by a stock model with its settings reset. Back up your presets before every update anyway; an update can reset them.
Hotone released a new firmware. Should I install it?
Only if you want what's in it more than Dubshift. Dubshift is made for the exact versions listed at the top, and the builder refuses newer ones until they're supported. You can always go back by flashing a supported stock version and building Dubshift from it again.
How do I go back to the stock firmware?
Flash the stock .bin from Hotone with the editor, the same way you flashed Dubshift. Presets made on Dubshift still load, as described above.
How do I know the result is right?
After patching, the page unpacks the new file again and compares it with what it meant to write. Dubshift builds also have to come out identical to the file we built and flashed ourselves.
Can I see the code?
It will be published with the first public release, including the source of every patch.
Does it cost anything?
No. You can support the work on Boosty. Supporters get each new Dubshift release a few weeks before everyone else; after that it is free for all. The English unlock is always free.
Boosty takes Visa and Mastercard from any country. Choose USD or EUR at checkout; that is the usual fix when a card payment fails. PayPal isn't available there.